Showing posts with label kids projects. Show all posts

Thursday, August 18, 2011

DIY- The Perfect Lamp for Kids


Looking for a simple yet amazing DIY for the weekend? I found it at matsutake, with her gorgeous stuffed animal lamp. It's perfect for any kid's room for your kids or as a present. Just take any animal made of fabric, coat it with a fabric stiffener, pull out all stuffing, and stuff the light string inside (be sure to use LED lights only if you don't want safety issues- and of course we don't, do we?)

Easy-peasy. And delightful.

Tuesday, September 21, 2010

Make Your Own Jellyfish -Tutorial

Last week my daughter had this assignment for school: she had to give class about jellyfish. She had to bring extra material, such as dough figures or a cardboard with pictures in it, but no, not my daughter. She had different plans. Using supplies we already had at home, she had this wonderful idea of making a real-like figure. I must tell you, the results were beautiful!

So, if you happen to have this assignment for homework (by you I mean your kids, of course ;), or if you just want a fun, unexpensive, and easy activity to do with them, this is for you. Making your own jellyfish with recycled materials is as easy as following my daughter's tutorial (with a few little ideas of mine).

Material:

Plastic bags
Clear hair rubber bands
Wodden stick
Food coloring
Scissors

How to:

If you want to try for colored jellyfish, use a few drops of food coloring on your bag.

Use your fingers to paint the bag.
Beware of blue fingers!

Turn the bag inside-out. Use the rubber band to mark the division between head and umbrella. The distance depends on the size of your bag, but it's somewhere between 1/2 and 2/3 of the bag.

Once you put the rubber band, it should look like this.

Use another bag to cut out spirals. This is a step for you, since it's a little tricky for kids.

Place the stick on the inside, and secure it with another rubber band. Use this same rubber band to place the spirals in place. (You should take the spirals by the center tip). The spirals are very important for they make pretty tentacles. Do as many as you need (the more, the merrier =).


Done!


If you leave the bags unpainted, they will make gorgeous white jellyfish.


These jellyfish are very easy to make and you'll be sure to get great results. If you go up and down with the stick holding the jellyfish, it will move just like the real ones do. That makes them so perfect! My daughter liked them so much, she wanted to keep them in her room as part of her decoration. By the way, her teachers were delighted, for it was a very creative way of reusing materials.

What do you say?
Like 'em?


See ya' in Twitter !


Wednesday, July 7, 2010

Fun Chalkboard Projects for Home

If you like the chalkboard trend but aren't really into painting a whole wide wall, I've got news for you. I've gathered some excellent ideas from all over the blogosphere, and they're really quite fun too. Chalboarding might have never been this easy.
bedzine pots
Paint your pots with chalkboard paint for easy marking on your plants. Can you imagine it in a herbal garden? Great!
house to home jar labels
I think labelling is one of the coolest functions of using chalkboard paint. These are so cute!
can house and home placecards
This is a great idea for parties and events. I could totally picture these in a wedding.vinyl chalkboard
An even easier option to paint are vinyl wall decals. No need to get dirty! 

Anyhoo, these are little cute ideas, easy to do and fun, for your home.

If you are into major changes (should I say, challenges), chalboard paint still has more ideas for us!!!! (I could really, and I mean really talk about this forever). =)

Let's start sharing the ideas...
apt ther magnetic paint
You might have heard or read about magnetic paint. If not, here it goes: there's actual magnet paint on the market. Just as easy to do on your walls as regular paint, it instantly turns any smooth surface into a magnetic board.
But even cooler, if you use chalkboard paint afterwards. Your surface pretty much becomes a real chalkboard, ready for you to hang thing on it (just as we do with our fridge).
apt ther mag chalk
It's out of this world for me. According to multiple tutorials, you just have to paint with magnetic paint, and THEN use the chalkboard paint. Piece of cake!

And finally, this is something that got me really hooked. Did you know you could have your own chalkboard paint in your own color of choice?
I tell you, things keep getting better and better! The always fab, Martha Stewart tells us how:
custom chalkboard how to MS custom color chalkboard
So, you need only 1 cup of flat-finish latex paint and 2 tablespoons of unsanded tile grout (white). That's all there is to it.

I've read that it's easier for you to mix the grout in a little water before mixing it with your paint, because the grout makes it heavy.

So there you have it. Of course the basic black and green chalkboard paints are pretty, but why have limitations on us and our home projects? 
chalkboard tray
apartment therapy
colored chalkboard
I tell you, options are endless!

Friday, March 26, 2010

Casa Green - Terrariums

I received a couple of questions regarding this image of designer Thom Filicia. Are you familiar with terrariums?

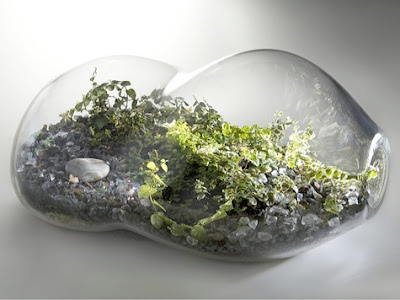
Terrariums come in different shapes, sizes, and styles. They are so elegant and own a timeless beauty.

I love organic shaped containers for terrariums.

And I love easy-to-do,  Martha Stewart terrariums.

Especially when they are such a fun project to do with kids.

Light bulbs are also another great alternative.

Closed terrariums are a great choice for tropical plants.

If  you choose a desert theme for your terrarium, you need your container to be open.

Posibilities are endless.


I'm especially intrigued by air plants.

A few important notes if you're considering growing a terrarium:
You'll need:

A layer of gravel.
A layer of charcoal.
Potting mix.

Mist the soil before covering.


Terrariums need light, so a place close to a window is an excellent place for it. Don't put it under direct light.

If you'd like to do a single plant terrarium, do it easy with a container. Be sure to arrange 1 inch of pebbles in the base. Use a ceramic pot for your plant (not a plastic one). Mist the soil with water before you cover it. Piece of cake!

Are you tempted by terrariums? I am!

{images via: decor8, remodelista, martha stewart, designswan, design sponge, house beautiful, real simple, renest, the fern and mossery}

Monday, February 15, 2010

How to Make Rice Krispies Treats

This was a fun weekend for us. We had a blast celebrating Valentine's Day together as well as with our families and friends. Can't get any better than that.

At least that's what I thought yesterday night, when the day was practically over. That's when my daughter asked me to make something together for her classmates and teachers for Valentine's Day. At 8:00 p.m. this was a tough challenge. I was almost ready to pass the opportunity when I remembered a great and easy recipe both of us had made together a few years back.

Have you tried these?

I bet you have. And If you're anything like me, I bet you like them, too. Kids LOVE Rice Krispies Treats, and who doesn't? They make the perfect treat for any occasion. Seriously, any: birthday parties, Valentine's, Mother's Day, Halloween, Christmas... you name it.

These delights are very easy to do and take as much as 30 minutes in total, so I thought I HAD to share:

Rice Krispies and
Marshmallow Treats


You'll need:

3 tablespoons butter (or margarine)
1 package (10 oz) marshmallows
6 cups of Rice Krispies
food coloring (optional)

How-to:

Melt butter over low heat.

Now, add your marshmallows and stir. They will start melting, so you need to keep stirring until they melt completely. This is the moment to add food coloring if you want to make colored treats. (If you do, you should only use white marshmallows). We used 4 drops of red coloring.

Add the Rice Krispies litte by little, until they are evenly covered.
Remove from heat.

Butter your baking sheet or surface where you're spreading the mixture (you can also use cooking spray).

Use a buttered spatula to press the mixture evenly thoughout the pan or surface.

The mixture is very sticky and it will cool quickly, so you might want to work it with your hands. In this case, butter your hands to prevent making a huge mess!

Cut with cookie cutters or cut into squares with knife for the traditional look.
You can even use lollipop sticks and cover one end with the mixture into a small ball to make lollipop treats.


Aren't they sweet?

Hope you all had a great Valentine's Day!

Sharing with:

Making the World Cuter
DIY Day at A Soft Place to Land
Toot Your Horn Tuesday at Silly Little Sparrow
Victory of the Week at Design-aholic

LinkWithin