Showing posts with label balcony. Show all posts

Monday, May 9, 2011

Sweet Jar Lanterns - Simple Tutorial

Longer days, warmer weather, everything is perfect for the lovely, summer outdoors. After working on a candle catalogue production these last couple of days, I came up with an easy DIY project to share in Casa Haus. Being such a lighting fan (especially candle lighting), I've been pretty busy coming up with this easy tutorial.
 I hope you enjoy it!


I love this DIY because it is really easy, and it's just as good for both home and party decor. Plus, it's eco-friendly. Win-win situation here!

So let's start, shall we?

Here's what you'll need:
  • Clean and empty jars.
  • Tea or votive candles.
  • Metal wire (mine was 24 gage)
  • Wire cutters
Cut 1 yard of wire and wrap it under the lip, forming a tight ring.


 Twist the wire together to close the ring.


Twist all your way up.

Bend the twisted wire over the top forming a handle.
Carefully introduce the wire's tip into the opposite side of the ring. This is a little tricky, since the ring must be tight, but be patient!

Bend the wire up and twist some more to finish.

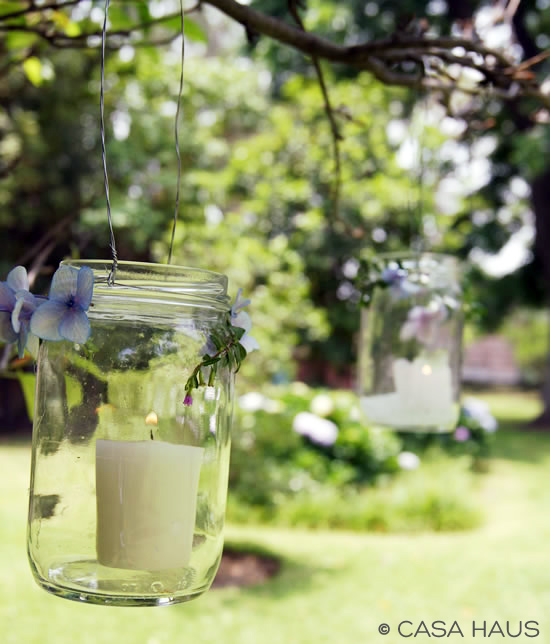
This is an extra step, but it's totally worth it. Hotglue flowers or foliage (artificial works just as good).


That's it! Now just place the tea candle inside, and hang them around.  I love the way they look in my parents' garden.


Enjoy your week!

**update**

For those of you coming from Kate's Spring/Summer link party,
welcome!
I hope you enjoy it around Casa Haus!!!

Friday, April 29, 2011

Amazing Terrace

Hi there! How you doin'? I had the busiest, most unbearable day in months. Full non-stop. In these moments, I'm wishing for something like this all for myself. 

 house to home

Oh, how I need this! What would I do here, you ask? Hmmmm, let's see. I guess I could  take a nap, read books, devour design magazines, and then have a mojito with my amorcito if I tried. Still, tomorrow (I should be saying today) is going to be just as yesterday, so I hope to recover this weekend. All I know for fact is we're using our brand new camera for the first time. I'm so excited!!!

What are you up to this weekend?

Tuesday, January 11, 2011

Green Space


I can't get enough of this great balcony. Lack of space isn't enough reason not to have a beautiful green room for your own.

Love it!
 

via apartment therapy

Thursday, January 6, 2011

House Inspiration - House with Beautiful Balcony


Simple, and yet oh so divine!
I love white over white, with a few splashes of color here and there in details.
The balcony is definitely one of its best attributes. Love it!
Wish I could be out there, enjoying the great view.

P.S. Does anyone know the name of the flower on the table out in the balcony?


Friday, August 27, 2010

Amazing transformation

Weekend is here again! I can't believe September is right around the corner. August was a rush for me. What are your plans this weekend? J and I have an exciting thing going on, BUT that's a story I'm hoping to share with you next week. In the meantime, let's start sharin' eye candy. Yum!

I just found Tim and his incredible condo make over. It took him two years, but it was all well worth it. Best of all is getting to see the before and afters... LOVE them.

LIVING ROOM - before

LIVING ROOM - after

Another view of the living room.

KITCHEN - before

KITCHEN - after
{gotta love the dark flooring in contrast with the white kitchen, great job!}

HALLWAY - before

HALLWAY - after

FOYER - after
{I love the mirrors in both this room and the living room}

BATHROOM - before

BATHROOM - after
{little things DO make big changes}

BALCONY - before

BALCONY - after

You know I have a thing on beautiful balconies. I really adore this one. The blue and the lanterns are dreamy.

Which is your favorite room?

Happy weekend!

If you want to check Tim's blog, click here!


Thursday, March 4, 2010

Balcony Makeover

One of the things I enjoy the most about our Master Bedroom is it's litte balcony. Actually, it's probably the feature I like the most about the house, and one of the reasons I fell in love with it. Eventhough our room is small, having the balcony makes it feel slightly bigger and warmer.

Regular readers out there might remember what it looked like, and how we've been trying to work it into something more "us".

We went from this:

To this:

It's amazing how little changes do wonders. I love waking up and looking outside every single day. Can't help it. Sometimes I actually get to see hummingbirds wandering around the blooms.

I planted these lovely tiny flowers in the topiaries' containers.

Here's a close-up for you. ;)

Aren't they lovely? To me they're all cuteness.

Oh, but what I'm most proud of are the mallows hanging from the balcony.

I love the blossoms. The colors are so inspirational! These pretty gals didn't seem to like this spot at first, they made me have hard times. I'm so happy they feel at home now.

Of course I'd still love to add a couple chairs to the spot, but so far, I'm enjoying this space so much!

Friday, February 5, 2010

Getting the Dirty Job Done -Part II

So, it's no longer a dirty job, but it's still the second part of the project. And it's still a little messy.

As I was telling you in yesterday's post, immediately after the sun came out, I got my hands ready to continue working on my latest project. I know you people have it figured out, of course. After all those inspirational pics from here and here, it's obvious I've been working on our balcony make over.

You probably know my plans for the Eugenia trees too.

That's right. I made a topiary. Actually, I made TWO topiaries. Wo-hoo! So if you're wondering how to make a topiary, you're in the right place.

How to Make a Topiary
tutorial


1. Start with a straight-center plant or tree.
I used Eugenias, but Boxwoods and Bay trees are also useful. You can even use a citrus tree.

2. Remove lower branches with garden scissors.
Work your way from bottom up.

3. Groom the topiary,
cutting off leaves or branches standing out.


4. In case your trunk is thin, place a thin stick into the soil next to the trunk and tie them together.
(In my case, this wasn't necessary)


5. Enjoy!


Before:


After:


Sigh. Isn't it lovely?

Some final notes:

At first, I wasn't sure I had bought the right kind of tree for the project. Topiaries in my inspirational images seemed young, with thin trunks. I was looking for that at the nursery garden, but topiaries aren't very popular around here. I guess I could have bought a new bush or tree, and trained it to grow as I wanted it. But I couldn't wait for it to grow up to the point I needed it. I wanted a topiary NOW.

The girl at the nursery adviced me to take this tree, and in the end, I'm happy with the results, though I would have rather gone for a slimmer trunk.

I hope you enjoyed the tutorial.
Stay tuned for the complete balcony makeover coming soon!

Sharing with

Strut your Stuff Thursday at Somewhat Simple
Transformation Thursday at The Shabby Chic Cottage
Get your Craft on Thurs at Life as Lori
Show off your Stuff at Fireflies and Jellybeans
Show and Tell Friday at My Romantic Home
Frugalicious Friday at Finding Fabulous
Remodelaholics Anonymous at Remodelaholic
Victory of the Week at Design-aholic
Saturday Nite Special at Funky Junk Interiors
Metamorphosis Monday at Between Naps on the Porch
Make it for Monday at Cottage Instincts
Making the World Cuter
Make your Monday at The Twice Remembered Cottage
Craft Schooling Sunday at Creative Jewish Mom
DIY Day at A Soft Place to Land
Toot your horn Tuesday at Silly Little Sparrow
Show and Tell at Blue Cricket Design
Penny Pinching Party at The Thrifty Home

LinkWithin